Aws ec2를 이용해 Django 서버 배포하기에 앞서
- 네로의 다락방님의 글을 보며 진행하였습니다. 네로의 다락방님이 간결하고 알기 쉽게 설명해 주셔서 무사히 배포할 수 있었습니다. 감사합니다.
- 해당 글은 저의 프로젝트 배포를 진행하며 생긴 문제점과 해결방안 등 다시 정리해가며 글을 새롭게 작성됩니다.
- 진행하는 OS는 mac 환경입니다.
- window 환경이라면 mobaxterm 사용을 추천드립니다. (따로 가이드 작성 예정)
- 리눅스 명령어를 따로 설명하지 않습니다.
- COVID-19-REPORT 프로젝트를 실제 사용해 보기 위하여 배포를 진행합니다.
- 현재 글은 배포 방법만 정리하였으며 설명을 추가중에 있습니다.
배포에 사용할 계정 만들기

sudo adduser "사용자 이름"
Room Numer에는 1을 입력 후 Y를 입력해 새로운 계정을 만들어 줍니다.
새 계정을 만들어야 하는 이유
- 추가 예정
mysite.ini 파일 생성

; #linku_uwsgi.ini file
[uwsgi]

; # Django-related settings
; # the base directory (full path)
chdir = /srv/covid-19-report/

; # Django's wsgi file
module = project.wsgi:application

; # the virtualenv (full path)
home = /home/ubuntu/myvenv/

socket = /tmp/mysite.sock
chmod-socket = 666
chown-socket = jsji:jsji

uid = jsji
gid = jsji

enable-threads = true
master = true
vacuum = true
pidfile=/tmp/jsji.pid
logto = /var/log/uwsgi/covid-19-report/@(exec://date +%%Y-%%m-%%d).log
log-reopen = true
vscode로 돌아와 manage.py가 있는 위치에 .config/uwsgi를 생성하고 mysite.ini 파일을 만들어
새로운 계정으로 배포할 것을 알려줍니다.
완료 후 github에 커밋
ec2 서버 git pull

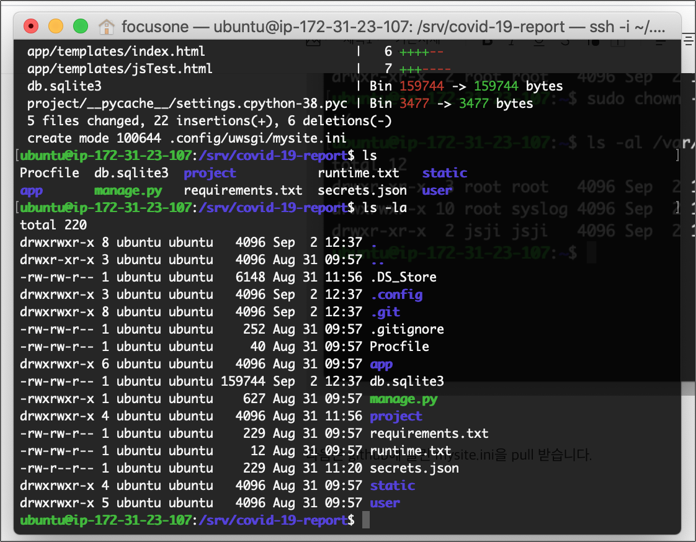
다음은 github에 올린 mysite.ini을 git pull 하여 update 받습니다.

mysite.ini 파일이 있는걸 확인했으면
새로운 계정으로 서버를 실행시켜 봅니다.

sudo /home/ubuntu/myvenv/bin/uwsgi -i /srv/covid-19-report/.config/uwsgi/mystie.ini
아래의 getting INI configuration from /srv/covid-19-report/.config/uwsgu/mysite.ini가 나왔다면 서버 실행이 성공한 것입니다.
이제 서버가 실행 됐다면
logto = /var/log/uwsgi/covid-19-report/@(exec://date +%%Y-%%m-%%d).log로 명시된 곳
/var/log/uwsgi/covid-19-report/의 위치로 들어가면 오늘 날짜에 로그가 쌓이는걸 볼 수 있습니다.

sudo tail "해당 날짜"
mysite.ini 파일을 이용해 서버를 실행시키며 생긴 오류들
1. mysite.ini 설정 에러
[uWSGI] getting INI configuration from /srv/covid-19-report/.config/uwsgi/mysite.ini
*** WARNING: Can't find section "uwsgi" in INI configuration file /srv/covid-19-report/.config/uwsgi/mysite.ini ***
*** Starting uWSGI 2.0.19.1 (64bit) on [Wed Sep  2 13:34:01 2020] ***
compiled with version: 7.5.0 on 31 August 2020 15:09:54
os: Linux-5.3.0-1033-aws #35-Ubuntu SMP Wed Aug 5 15:47:17 UTC 2020
nodename: ip-xx-xx-xx-xx
machine: xx
clock source: xx
detected number of CPU cores: 1
current working directory: /home/ubuntu
detected binary path: /home/ubuntu/myvenv/bin/uwsgi
!!! no internal routing support, rebuild with pcre support !!!
uWSGI running as root, you can use --uid/--gid/--chroot options
*** WARNING: you are running uWSGI as root !!! (use the --uid flag) ***
*** WARNING: you are running uWSGI without its master process manager ***
your processes number limit is 3802
your memory page size is 4096 bytes
detected max file descriptor number: 1024
lock engine: pthread robust mutexes
thunder lock: disabled (you can enable it with --thunder-lock)
uWSGI running as root, you can use --uid/--gid/--chroot options
*** WARNING: you are running uWSGI as root !!! (use the --uid flag) ***
uWSGI running as root, you can use --uid/--gid/--chroot options
*** WARNING: you are running uWSGI as root !!! (use the --uid flag) ***
The -s/--socket option is missing and stdin is not a socket.
chmod-socket: UNIX socket에 대한 권한 설정입니다.
666을 해야 실행이 가능합니다.
2. uwsgi 미설치 에러
가상환경을 실행시켜 줍니다.
3. Internal Server Error
--- no python application found, check your startup logs for errors ---
[pid: 1462|app: -1|req: -1/2] 124.48.218.247 () {40 vars in 779 bytes} [Wed Sep  2 13:48:39 2020] GET /favicon.ico => generated 21 bytes in 0 msecs (HTTP/1.1 500) 2 headers in 83 bytes (0 switches on core 0)
SIGINT/SIGQUIT received...killing workers...
gateway "uWSGI http 1" has been buried (pid: 1463)
worker 1 buried after 1 seconds
worker 2 buried after 1 seconds
worker 3 buried after 1 seconds
worker 4 buried after 1 seconds
goodbye to uWSGI.
VACUUM: pidfile removed.
해당 에러는 mysite.ini 설정 에러입니다.
저는 해당 부분을
#linku_uwsgi.ini file
[uwsgi]

# Django-related settings
# the base directory (full path)
chdir           = /srv/covid-19-report/
# Django's wsgi file
module          = project/wsgi.py:application
# the virtualenv (full path)
home            = /home/ubuntu/myvenv/
virtualenv = /home/ubuntu/myvenv/

# process-related settings
# master
master          = true
# maximum number of worker processes
processes       = 4
# the socket (use the full path to be safe
# socket          = /home/linku/LinkU/linku_backend/linku.sock
http             = :8080
# ... with appropriate permissions - may be needed
chmod-socket    = 666
# clear environment on exit
vacuum          = true
# daemonize the process
logto = /var/log/uwsgi/covid-19-report/@(exec://date +%%Y-%%m-%%d).log
# process pid
pidfile=/tmp/jsji.pid

# newrelic settings
enable-threads = true
single-interpreter = true
lazy-apps = true
이렇게 바꾸어 해결하였습니다.
; #linku_uwsgi.ini file
[uwsgi]

; # Django-related settings
; # the base directory (full path)
chdir = /srv/covid-19-report/

; # Django's wsgi file
module = project.wsgi:application

; # the virtualenv (full path)
home = /home/ubuntu/myvenv/

socket = /tmp/mysite.sock
chmod-socket = 666
chown-socket = jsji:jsji

uid = jsji
gid = jsji

enable-threads = true
master = true
vacuum = true
pidfile=/tmp/jsji.pid
logto = /var/log/uwsgi/covid-19-report/@(exec://date +%%Y-%%m-%%d).log
log-reopen = true
다시 서버로 접속하면
자신의 퍼블릭 DNS(IPv4):8080

http://ec2-15-164-100-29.ap-northeast-2.compute.amazonaws.com:8080/

배포용 계정을 이용해 uwsgi 배포
끝!
'코딩공부 > Server' 카테고리의 다른 글
| Aws ec2를 이용해 Django 서버 배포하기 - static 파일 설정 (0) | 2020.09.11 |
|---|---|
| Aws ec2를 이용해 Django 서버 배포하기 - nginx와 uwsgi 연결 (0) | 2020.09.10 |
| Aws ec2를 이용해 Django 서버 배포하기 - uWSGI 연결 (0) | 2020.09.08 |
| Aws ec2를 이용해 Django 서버 배포하기 - ec2 인스턴스 가상환경, runserver 실행하기 (0) | 2020.09.07 |
| Aws ec2를 이용해 Django 서버 배포하기 - ec2서버에 secrets.json 파일 전송하기 (1) | 2020.09.07 |